Triggers
Triggers are rules that are applied to submissions that arrive in your team's Submissions area.
You can set up triggers to automatically email users, to validate submissions, trigger other workflows, or export to 3rd party solutions such as Dropbox.
Creating a Trigger
Go to Submissions area of your team.
Select Triggers (bottom right)
Choose Add Trigger
Enter name of trigger (eg. "Trigger to send an email to my boss")
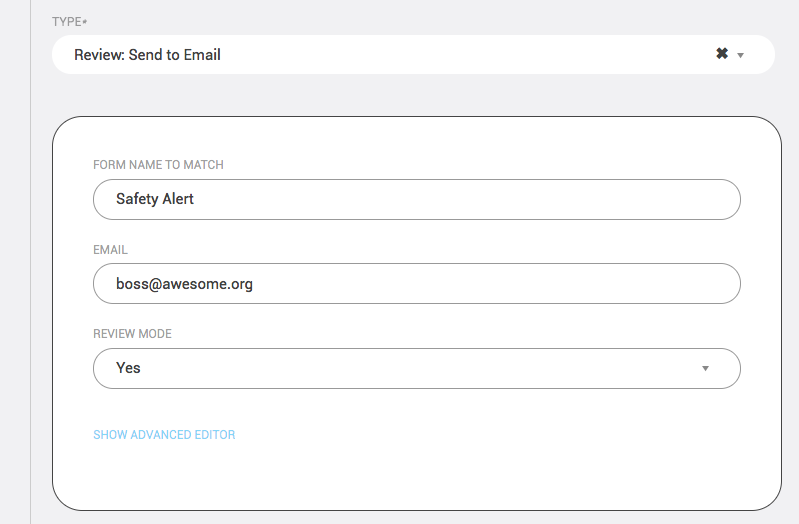
Choose the type of trigger - based on the type you select, you will get a sample trigger with default form fields displaying. Use the Advanced Editor for any customisation of the form fields you see displayed.
To see if a trigger ran on a submission, go to the Submission in the Admin area. Choose Advanced. Choose View Event Log.
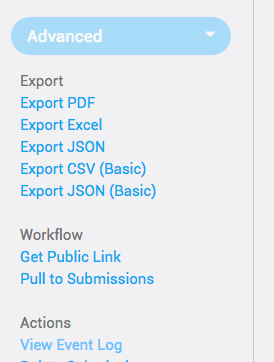
You should see the trigger logged if it has run successfully.

Advanced Editor
The advanced editor is a toggle mode to allow you to edit the Trigger rule directly. This is in JSON format (see https://www.json.org/ ).
For more advanced triggers, you will need to use the Advanced Editor.
Example Triggers
Please note that the below examples are showing the "advanced editor" view which we recommend using for advanced customisations.
Sends a copy of the form to the designated email address. You can specify a single address or multiple comma-separated addresses.
matchon/matchval - (optional) The basic criteria (field name & value) the trigger must meet. Use _name to match on the Form's nameemail - The address(es) to send a copy of this submission toattachment_format - The format the submission will be sent, if sending as an attachmentreview_mode - Set to true if the recipient needs to update the Submission
{
	"matchon":"_name",
	"matchval":"Name of Form",
	"email" : "me@example.com",
	"attachment_format" : "pdf",
	"review_mode" : false
}
Email to Field
Sends a copy of the form to an email address which is extracted from a field in the Submission itself. The field is expected to be an email field containing a single email addrress or a text field with multiple comma-separated addresses.
matchon/matchval - (optional) The basic criteria (field name & value) the trigger must meet. Use _name to match on the Form's namefield - The form field containing the email address. This value should match the field's labelattachment_format - The format the submission will be sent, if sending as an attachmentreview_mode - Set to true if the recipient needs to update the Submission
{
	  "matchon": "_name",
	  "matchval": "Send to Field",
	  "field": "Send a copy to",
	  "attachment_format": "pdf",
	  "review_mode": false
}
Email with Conditions
Email and Email to Field both support "conditions" such as specifying form name.
{
	"email" : "me@example.com",
	"conditions": [
		{
		 "field": "_name",
		 "expected_value": "Form A"
		}
	],
	"cc_author":false
}
If you need conditions supported in another trigger, contact our support team by logging a ticket requesting assistance.
Email with Custom Subject
This example shows a few fields concatenated together.
eg. If the Form Name was "My Form" and the Submission Description was "Job 123", the subject would be set to be "My Form - Job 123".
{
	"email": "me@example.com",
	"subject": [
		{
			"type": "field",
			"value": "_name"
		},
		{
			"type": "text",
			"value": " - "
		},
		{
			"type": "field",
			"value": "_description"
		}
	]
}
Email to Group
Emails submission to every user in the team that matches the supplied group type.
{"group":"administrators"}
Support values: "administrators", "reporters", "members", "all". Conditions also supported.
Email with Review Mode
When review mode is configured, the user will be taken to the submission viewer within the team. Important note: the recipient must be a team member with reporter or administrator rights.
{"email":"fred@organisation.com", "review_mode": true}
eg 2:
{"group":"administrators", "review_mode": true}
Email with Status
This is useful for status change notifications .
{"email":"fred@organisation.com", "include_state": true}
MailChimp Subscribe
Please note you need to integrate your FormTab account with MailChimp before this trigger will work. To do this you must be the account owner and activate the integration here.
{
	"type": "mailchimp",
	"api_key": "xxxxxxxxxxxxxxxxxxxxxxxxxxxxxxxx-xxx",
	"list_id": "xxxxxxxxxx",
	"email_field": "Enter Your Email Address",
	"matchon": "_name",
	"matchval": "Form A"
}
NB. Matchon & Matchval is optional. Email field requires the field label of the email address for the list.
Dropbox
Please note you need to integrate your FormTab account with Dropbox before this trigger will work. To do this you must be the account owner and activate the integration here.
{
	"folders": [
		{
			"type": "field",
			"value": "_name"
		},
		{
			"type": "field_date",
			"date_format": "Y-m",
			"value": "_device_created"
		}
	],
	"export_type": "pdf",
	"export_name": [
		{
			"type": "field",
			"value": "_name"
		},
		{
			"type": "text",
			"value": "_"
		},
		{
			"type": "field_date",
			"date_format": "Y-m-d",
			"value": "_device_created"
		},
		{
			"type": "text",
			"value": "_"
		},
		{
			"type": "field",
			"value": "_reference"
		}
	]
}
Xero
Please note you need to integrate your FormTab account with Xero before this trigger will work. To do this you must be the account owner and activate the integration here.
The Xero trigger doesn't require any values in the JSON. Below is all you need to enable the trigger sending your submissions to your Xero inbox.
{}
If you don't require all submissions to be sent you can use the following JSON to define which form submissions you would like sent to your Xero inbox.
{
	"conditions": [
		{
			"field": "_name",
			"expected_value": "Form A"
		}
	]
}
Document Trigger
Copies fields from one form submission into a separate form and email to a user's inbox. Useful for scenarios where you have a Part A, then a Part B of a form. Filling in Part A and submitting can trigger the second form with the contents of Part A pushed through to the full form.
{
	"matchon":"_name",
	"matchval":"Sample Form - Part A",
	"generate":"Sample Form - Full",
	"recipient":"fred@example.com",
	"target_community":"347fbc23425575b4b8512c6c4aa5"
}
- The target community is the team that you want the second form to be created in. eg. you may have a Sales team and a Management Team; part A would sit in the Sales Team and the full form would sit in the Management team. To get your target community you can go to your team settings and retrieve your "TEAM TOKEN"
- Data is copied where there a match on the label - therefore, ensure your labels always match in the two forms
- Additional conditions beyond the "matchon" are supported, but optional. See Email with Conditions for example of conditions.
- Recipients can be defined in a field as follows:
eg. the sender email:
"recipient_is_field":true,
"recipient":"_username"

eg2. a form field (label name):
"recipient_is_field":true,
"recipient":"Staff Email Address"
Sharefile
{
	"subdomain": "yoursubdomain",
	"tld": "domain.com",
	"username": "yourusername@domain.com",
	"password": "yourpass",
	"base_folder": "base/folder/",
	"folders": [
		{
			"type": "field",
			"value": "Job ID"
		},
		{
			"type": "concat",
			"value": [
				{
					"type": "field",
					"value": "Project Name"
				},
				{
					"type": "text",
					"value": "."
				},
				{
					"type": "field",
					"value": "Address"
				}
			]
		},
		{
			"type": "field",
			"value": "_name"
		}
	],
	"export_type": "pdf",
	"export_name": [
		{
			"type": "field",
			"value": "_name"
		},
		{
			"type": "text",
			"value": "_"
		},
		{
			"type": "field_date",
			"date_format": "Y-m-d.h.i",
			"value": "_device_modified"
		}
	]
}
Description
Updates a submission's description to value(s) you define. This is a great way to enforce a strict naming convention without relying on user input. The description can be a combination of hard-coded values and dynamic values from the submission itself.
matchon/matchval - (optional) The basic criteria (field name & value) the trigger must meet. Use _name to match on the Form's namedescription - An array of values which will be concatenated for the final result. Each value is an object in the format of:
typeCan be either 'text' or 'field'valueIf 'type' istext, this value is used in the result. If 'type' isfieldthis is the name of the field to fetch the value from
{
	"matchon": "_name",
	"matchval": "PO Number",
	"description": [
		{
			"type": "text",
			"value": "PO-"
		},
		{
			"type": "field",
			"value": "_user_ref"
		}
	]
}
Tag
Tags can be applied to a Submission and appear in a column in the Submissions list. As Tags can be searched on, they provide a way to index key data you may wish to report on. The Tag trigger allows you to dynamically add tags using values from the submission itself.
matchon/matchval - (optional) The basic criteria (field name & value) the trigger must meet. Use _name to match on the Form's namefield - The name of the form field whose value you wish to use as a tag. Provide an array of field names to assign multiple tagsteam_tags - If set, the trigger will attempt to copy any Tags from the Submission's Team
Note, you can only use field or team_tags. If you include both keys, only the first will be processed.
1. Assign a field value to a tag
{
	"matchon": "_name",
	"matchval": "PO Number",
	"field":"_username"
}
2. Assign multiple field values to tags
{
	"matchon": "_name",
	"matchval": "PO Number",
	"field": [
		"Job No",
		"Client Name",
		"Due Date"
	]
}
3. Copy any Team tags to the submission
{
	"matchon": "_name",
	"matchval": "PO Number",
	"team_tags":true
}
Validate
{
	"matchon": "_name",
	"matchval": "Ground Survey",
	"conditions": [
		{
			"field": "report",
			"expected_value": "NOT NULL"
		}
	]
}
Webhook
{"url":"https://test.webhook.co.nz/formtabwebhook"}
TIP
Check out the Webhooks Reference for more about configuring Webhooks.